
About the time that Russia invaded Ukraine, someone in Romania tried to hack my bank account.
It probably had less to do with that global event, and more to do with my having connected to an insecure WiFi network. [1] It highlighted one of the points I’ve been harping on for years: that your connections away from home must be secured by a VPN.
And then I had to travel for a job. The hotel had free (unsecured) WiFi, but at least it had access point isolation [2]. Then I discovered that there were no Ethernet ports, access point isolation makes Chromecast unusable, that there were a maximum number of devices that could be connected (ever?) per guest reservation, and that if you "upgraded" your internet, you had to do it (and PAY for it) separately for each device. And that’s before trying to get the VPN working.
With a little fussing with my linux PC (using Network Manager – WICD won’t work for this one) and a $30 travel router, I’m still using the upgraded internet I paid for, but my Chromecast works (as well as games with non-standard ports), and all my traffic is routed over the VPN without much of a slowdown. It’s a little backwards from how I thought it would work, but it seems to be a solid solution, so here’s how I – and you – can do it. (If you’re using a Windows system, take a look at this post for similar solutions.)
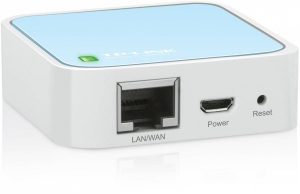 Aside from your laptop/PC which has both wifi and ethernet capabilities, you’ll need a travel router. I got the TP-Link TL-WR802N travel router, currently available on Amazon for US$30. It’s a small bit of kit, about five cm on a side. It comes with a USB cord, (small) wall wart, and very short ethernet cable.
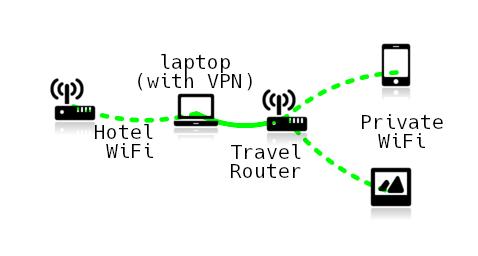
Overall Flow
My laptop wireless is connected "normally" to the hotel’s wi-fi. I am routing all traffic through Private Internet Access VPN, using OpenVPN over TCP port 443. The ethernet port on the laptop is connected to (and sharing the internet connection with) the TP-Link router, which is acting as a full router for everything else on its own wifi network. The things on that network (e.g. my Chromecast) can see each other. This also means that everything that is connected to that router is also routing across the VPN. The CPU overhead for the VPN is dealt with by the (relatively) beefy processor of the laptop, and everything connected to that network is also enjoying the "upgraded" internet that I purchased.
How To Set Up Network Sharing
First, set up your main computer with the hotel’s wi-fi as you would normally. If you’re going to purchase any upgrades, do so now. Once you’ve gotten the connection set up properly and logged in through whatever web portal they require, disconnect that wi-fi connection.
Optional: Set Up The VPN
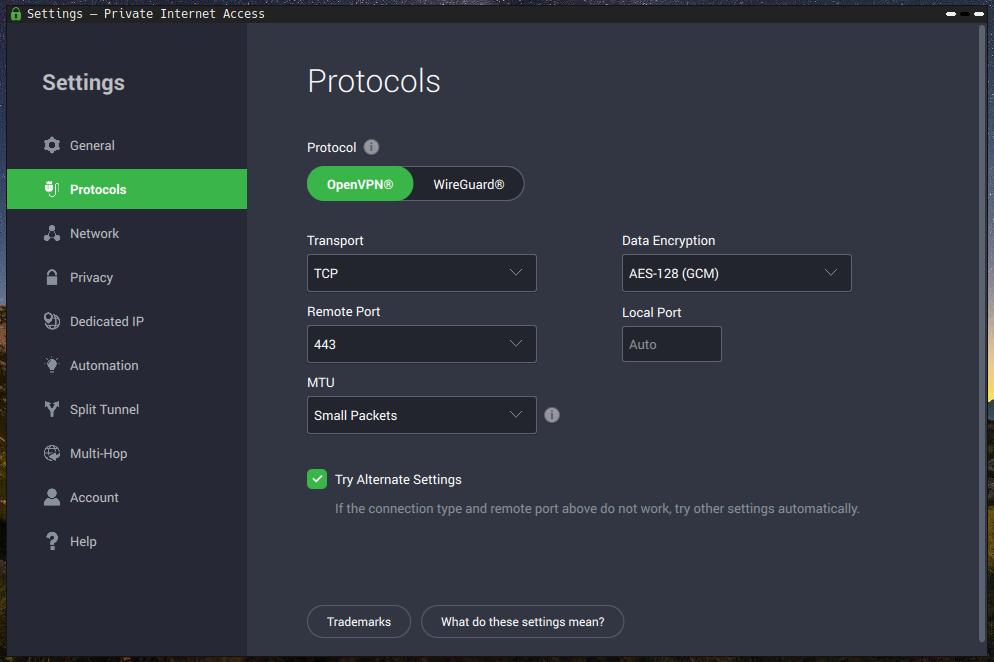
I’m using Private Internet Access, and have been for years. One of the nice things about their client is that you can easily change the way the VPN works. On a lot of quasi-open networks (like hotel or coffee shop wifi), many ports may be blocked, making it difficult to use a VPN.
However, OpenVPN can connect over a regular TCP port like 80 or 443 – just like most regular web traffic. With the GUI client for PIA, it’s a matter of changing a couple of sliders, as you can see in the screenshot below. If you’re using a different VPN provider, check with their documentation.
Once you get the VPN set up and running, disconnect it and all other network connections.
Set Up The Router
Right click on the Network Manager icon in your taskbar and choose "Edit connections". A window will pop up; click the plus sign with the hovertip of "Add connection".
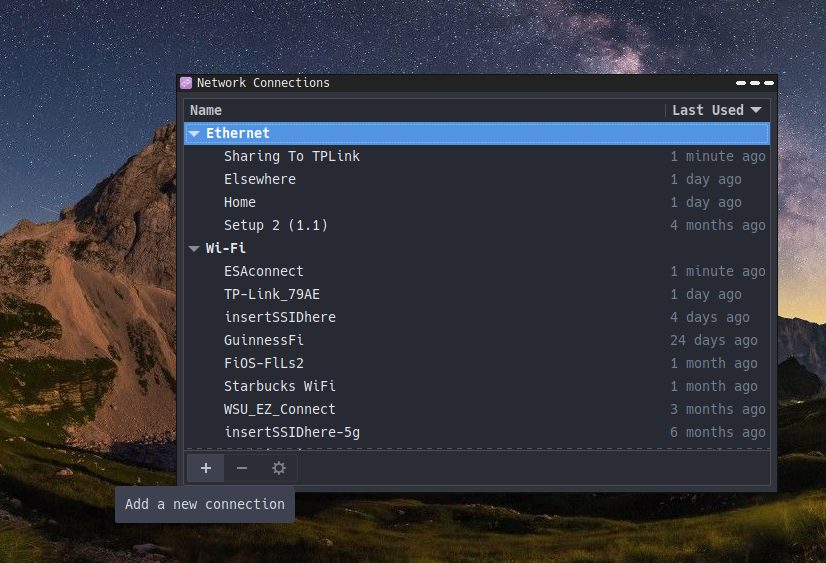
Choose "Ethernet" for the type of connection. Rename it to something so you know what it is (I’m going to call it Sharing To TPLink). Leave everything else as the default. Save and close the interface.
Plug in the travel router to the power supply, and connect the ethernet port on the router to the ethernet port of your main computer. Connect to Sharing To TPLink. Configure the router according to the manufacturer instructions – usually by firing up a web browser and going to a special URL. The TP-Link router has a "quick setup" wizard that was as easy as pie. You may not need to change any default settings on the router at all. It should be in "router" mode, where it is sharing an ethernet connection via wireless. DO make sure there is some kind of security setting on the wireless connection on the router. If you wish to specify your own DNS servers (highly recommended), do so here.
Do take a note of the SSID (or wireless network name) and the password it requires.
Final Configuration
Disconnect from Sharing To TPLink, and go back to "Edit connections" as you did before. This time, click on the IPv4 Settings tab. Change "Method" to Shared to other computers. On the IPv6 Settings tab, set "Methods" to Disabled. Save and close the interface.
Connect to the hotel (or whatever) hotspot WiFi. Kick on your VPN (if you’ve set it up). Then, WITHOUT disconnecting from the WiFi, connect simultaneously to Sharing To TPLink. [3]
Now you can connect your phone, Chromecast, tablet, and so on to the travel router’s SSID and enjoy a secure encrypted connection on all your devices.
Further reference:
https://askubuntu.com/questions/359856/share-wireless-internet-connection-through-ethernet#368231
https://www.tecmint.com/share-internet-in-linux/
Featured Photo by Nastya Dulhiier on Unsplash

[1] Or a release of a big password hack; if you think your password or password hash hasn’t been compromised at least once… well, you might think that, but that doesn’t mean it’s true.
[2] That means that if my computer and your phone are using the same wifi, they cannot talk directly to each other (or know the other exists) on the network.
[3] This is why you need Network Manager – its ability to use all network interfaces simultaneously. Last time I checked, WICD was unable to do this.