
One of the reasons that people stick with Photoshop instead of using the free and open source and crossplatform "GIMP" [1] alternative is because the latter has historically had issues exporting to CMYK for print preprocessing. If you’re not an artist or have had to work with print products, you may not know the difference between RGB and CMYK; DesignBro has a good explainer of the difference.
While there was an old plugin and workaround [2], that hasn’t been ported to the newer versions of GIMP. I found (after a lot of wading about through forum threads) is that there’s two ways to get CMYK separated files with current (2022, version 2.10.*) versions.
Get Color Profiles
Since you’re going to be working with different color profiles, you’ll need to get (and install) those. Here’s guides for Windows and Mac.
If you’re on Linux, the Adobe Linux RPM package you’ll see linked to here and there across the web no longer exists. Luckily, the color profile for Windows will work just fine. You can get that by using wget or curl:
wget ftp://ftp.adobe.com/pub/adobe/iccprofiles/win/AdobeICCProfilesCS4Win_end-user.zip
curl ftp://ftp.adobe.com/pub/adobe/iccprofiles/win/AdobeICCProfilesCS4Win_end-user.zip --output AdobeICCProfiles.zip
and then unzipping the contents into /usr/share/color/icc. I recommend making a subdirectory to keep them straight, e.g. /usr/share/color/icc/Adobe, but you do not have to.
Additionally, on Debian (and presumably Ubuntu) you can sudo apt install icc-profiles to get more color profiles to choose from.
Using “Decompose” as a Workaround
If you have installed the currently existing Separate or Separate+ plugin (it’s in the gimp-plugin-registry package) you’ll find it in the menus under "Image"… but the separation portion of the plugin crashes when you run it. User "richgug1" found a workaround, though. Here’s what you do:
- Flatten your image/merge your layers.
- Under the “Colors” menu entry, and the “Components” submenu, select “Decompose”. Choose the “CMYK” color model.
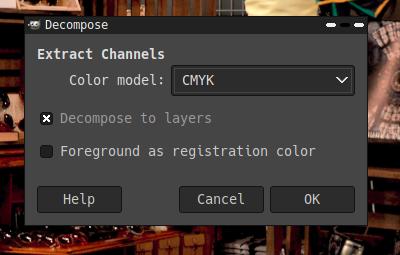
- It will create four layers named
cyan,magenta,yellow, andblack. - Rename the layers
C,M,Y,Kin that order. -
Under the “Image” menu, and “Separate” submenu, choose “Export”. It will return an error.
-
Repeat the prior step, and instead of an error, you will be able to export the file. Export it as a TIFF file.
This method is significantly faster than the second method, and a lot less computationally heavy. That said, you have no options for output selection or settings. The output color profile is “chemical proof” instead of any other color profile. Yes, there is a place to set color profile options in GIMP, and when exporting it asks for the CMYK default profile… but I’m not 100% sure that it actually embeds it properly. That may not seem like a big deal, but there is a visible difference. We’ll look at the output after I tell you about the second method.
Using Cyan as a (sort of) plugin
After trying Cyan, though, I’m really surprised it took me so long to find a mention of it, because it is very much the “just works” option.
Cyan is an open source cross-platform image viewer and converter, designed for prepress (print) work. Like converting an image from RGB to CMYK, or the other way around. Cyan supports color profiles complying with the International Color Consortium (ICC) standard, and strives to create as color-accurate images as possible, with support for RGB, CMYK and GRAY with up to 32-bit image depth.
Installing it was as easy as uncompressing the archive and running Cyan itself. The first time you run it, make sure to close GIMP first. The first time Cyan starts, it will scan your home folder for GIMP 2.x plugin folders, and, if it’s not already installed, it’ll take care of integrating itself with GIMP, and you don’t want to interfere with that.
On that first run of Cyan, you’ll also want to set some color profiles. I chose “Relative Colormetric” as the output intent, clicked the “black point” checkbox, and “US SWOP v2” for the color profile at the bottom for CMYK and up at the top of the screen for “Output”. I’ve used that color profile at a print shop’s request; your print shop may want a different color profile. (For example, DriveThru / OneBookshelf ask that you use a different color profile that I’ll mention later. [3] )
Then close Cyan, open GIMP and your image file, and do the following steps:
- Flatten your image/merge your layers.
- Under the “Cyan” menu item, choose “Export”. GIMP will report that it is “waiting on Cyan” until you close Cyan in step #5.
- Cyan will launch and import the image.
- If it asks you to import a layer (even if the preview shows nothing or a black image), click yes. [4]
- Wait for Cyan to do it’s thing, then save the image and close Cyan. You’re done!
Cyan lets you tweak and change the settings of your color profiles far more in-depth than the first workaround, but it does take a hot second to do all that processing.
Comparison of Output (“Decompose” vs Cyan)
I used this image to test it out:

The output image sizes were almost identical (78.4 MB for decompose versus 78.2 MB for Cyan with the SWOP profile and 81.2 MB for Cyan with the color profile that OneBookshelf recommends), but there is a significant visual difference due to the output color profile. The best way to show you the difference is with this screenshot taken of all four images on the same monitor at the same time, opened with the same program (feh, if it matters).
In order from top to bottom, you have the original image, the decompose method, Cyan’s ouput with SWOP profile, and Cyan’s output with the CGATS color profile. These differences you are noticing here are even more pronounced once they’re printed, so the color profile you use matters.
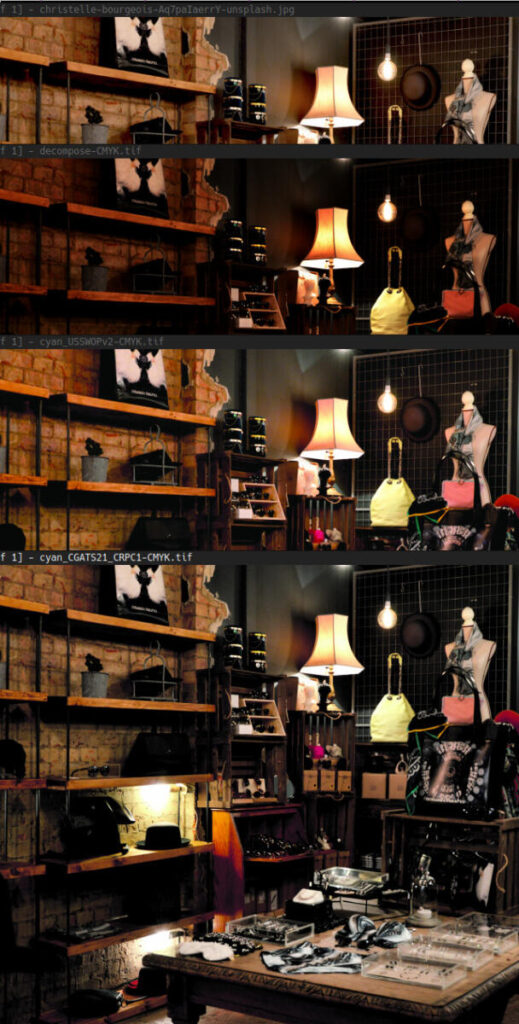
If you’re interested in doing your own comparison of the files, they’re all in this folder on Box: https://app.box.com/s/c28g36klczivo4j3za0cab0z8f8g7r3f
So which to use? I think that Cyan wins, simply because it both can accommodate any specific color profile requirements your printer might have, and because it just pretty much works once you have the color profiles copied onto your computer. If you’re bothering to print something out and care enough to ensure the colors are reproduced faithfully, the few extra seconds it will take Cyan to run computations are more than worth it.
And if this was the thing holding you back from jumping from Photoshop to GIMP was this feature [5], reading this just saved you about $120 a year.
Featured Image by ptra from Pixabay
[1] Yes, I know. The name makes me uncomfortable too, even though I know it’s an acronym for Graphics (or GNU, depending on who you ask) Image Manipulation Program. I believe there’s a re-branded fork to avoid the acronym; however, the main branch retains the old name, and that’s what most people who would benefit from this will be searching for.
[2] An example explanation of the OLD workaround: https://ana.aktivix.org/the-gimp-and-cmyk/
[3] There are other specifications that printers may have – such as specific sub-types of PDF – that will be a separate guide.
[4] I just realized while writing this that the “black image” is because CMYK is subtractive. Duh. :: facepalm ::
[4] Related: Make GIMP look like Photoshop, Photo Editing in GIMP for starters.
Thanks for the article. Official website for Cyan is https://cyan.fxarena.net, project website is https://github.com/rodlie/cyan. The SourceForge site is mostly just a mirror for the releases.